
目的
メニューバーを作成するGtk.PopoverMenuBarのmodelは、XMLで定義することも可能です。このXMLは、インデントを用いることで見やすい形に整理することや、別ファイルに保存することが可能であるため、使用するとGio.Menuよりも見やすいプログラムをすることが可能です。
今回は、XMLを使用してGtk.PopoverMenuBarのmodelを作成する方法を見ていきます。

XMLによるGtk.PopoverMenuBarのmodel作成・追加
XMLファイルによるmodel記入
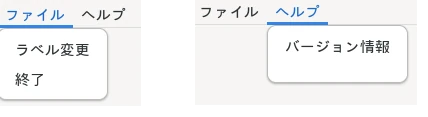
下図のようなメニューを作る場合、XMLは以下のように記入します。
MENUBAR_XML = """
<!--?xml version="1.0" encoding="UTF-8"?-->
<interface>
    <menu id="menu">
        <submenu>
            <attribute name="label">ファイル</attribute>
            <item>
                <attribute name="label">ラベル変更</attribute>
                <attribute name="action">win.label_tc</attribute>
            </item>
            <item>
                <attribute name="label">終了</attribute>
                <attribute name="action">app.quit</attribute>
            </item>
        </submenu>
        <submenu>
            <attribute name="label">ヘルプ</attribute>
            <item>
                <attribute name="label">バージョン情報</attribute>
                <attribute name="action">app.about</attribute>
            </item>
        </submenu>
    </menu>
</interface>
"""
XMLの内、以下の部分が大本の部分の定義であり、id=”menu”と指定しています。
<!--?xml version="1.0" encoding="UTF-8"?-->
<interface>
    <menu id="menu">

    </menu>
</interface>
XMLの内、以下の部分が’ファイル’と’ヘルプ’を定義している部分であり、それぞれ<submenu></submenu>に囲まれた<attribute name=”label”></attribute>内に名前を指定しています。
        <submenu>
            <attribute name="label">ファイル</attribute>

        </submenu>
        <submenu>
            <attribute name="label">ヘルプ</attribute>

        </submenu>
XMLの内、以下の部分が’ラベル変更’、’終了’、’バージョン情報’を定義している部分であり、それぞれ<item></item>に囲まれた中に、ラベルとアクションを指定します。
      <!-- ファイルのsubmenu内に記入 -->
            <item>
                <attribute name="label">ラベル変更</attribute>
                <attribute name="action">win.label_tc</attribute>
            </item>
            <item>
                <attribute name="label">終了</attribute>
                <attribute name="action">app.quit</attribute>
            </item>
      …
      <!-- ヘルプのsubumenu内に記入 -->
            <item>
                <attribute name="label">バージョン情報</attribute>
                <attribute name="action">app.about</attribute>
            </item>
XMLデータの取得(ファイル内に記入)
ファイル内に記入したXMLより、Gtk.Builder.new_from_stringでbuilderを定義して、builderよりメソッドget_objectにより、menuを取得します。
そして、取得したmenuをGtk.PopoverMenuBar.new_from_modelで、modelに指定することでメニューバーが作成されます。
        builder = Gtk.Builder.new_from_string(MENUBAR_XML, -1)
        menu = builder.get_object("menu")

        menubar = Gtk.PopoverMenuBar.new_from_model(menu)
Gtk.PopoverMenuBarのサンプルプログラム
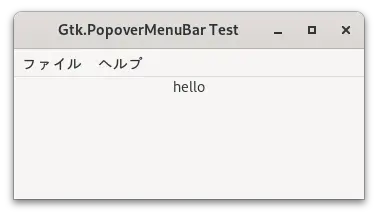
以下のサンプルプログラムを実行すると、下図のような画面が表示されます。メニューバーの’ラベル変更’を押すと、’hello’が’Good-Bye’に変わります。
また、’バージョン情報’を押すとGtk.AboutDialogが表示され、’終了’を押すとプログラムが終了します。
Gtk.AboutDialogに使用するアイコン画像(下のSmple Iconと表示した画像)
サンプルプログラムと同じフォルダに保存してから実行してください
import gi
gi.require_version('Gtk', '4.0')
from gi.repository import Gtk, Gio


APPID = 'com.github.taniyoshima.g4_fblog_menubar2'

MENUBAR_XML = """
<!--?xml version="1.0" encoding="UTF-8"?-->
<interface>
    <menu id="menu">
        <submenu>
            <attribute name="label">ファイル</attribute>
            <item>
                <attribute name="label">ラベル変更</attribute>
                <attribute name="action">win.label_tc</attribute>
            </item>
            <item>
                <attribute name="label">終了</attribute>
                <attribute name="action">app.quit</attribute>
            </item>
        </submenu>
        <submenu>
            <attribute name="label">ヘルプ</attribute>
            <item>
                <attribute name="label">バージョン情報</attribute>
                <attribute name="action">app.about</attribute>
            </item>
        </submenu>
    </menu>
</interface>
"""


class Gtk4TestTest(Gtk.ApplicationWindow):

    def __init__(self, app):
        Gtk.Window.__init__(
            self, application=app, title='Gtk.PopoverMenuBar2 Test',
            height_request=150, width_request=350
        )

        # 'ラベル変更'用のアクション
        action = Gio.SimpleAction.new("label_tc", None)
        action.connect("activate", self.on_label_change)
        self.add_action(action)

        builder = Gtk.Builder.new_from_string(MENUBAR_XML, -1)
        menu = builder.get_object("menu")

        menubar = Gtk.PopoverMenuBar.new_from_model(menu)

        vbox = Gtk.Box(orientation=Gtk.Orientation.VERTICAL)
        vbox.append(menubar)
        self.label = Gtk.Label(label='hello')
        vbox.append(self.label)
        self.set_child(vbox)

    # アクションlabel_tcの処理
    def on_label_change(self, action, param):
        self.label.set_text('Good-Bye')


class Gtk4TestApp(Gtk.Application):

    def __init__(self):
        Gtk.Application.__init__(self, application_id=APPID)

    def do_startup(self):
        Gtk.Application.do_startup(self)

        # '終了'用のアクション
        action = Gio.SimpleAction.new('quit', None)
        action.connect('activate', self.on_quit)
        self.add_action(action)

        # 'バージョン情報'用のアクション
        action = Gio.SimpleAction.new("about", None)
        action.connect("activate", self.on_about)
        self.add_action(action)

    def do_activate(self):
        window = Gtk4TestTest(self)
        window.present()

    # アクションquitの処理
    def on_quit(self, action, param):
        self.quit()

    # アクションaboutの処理
    def on_about(self, action, param):
        icon = Gtk.Picture.new_for_filename('icon.png').get_paintable()
        dialog = Gtk.AboutDialog(
            authors=['taniyoshima'],
            comments='AboutDialogのサンプル',
            license_type=Gtk.License.MIT_X11,
            version='1.0.0',
            program_name='Gtk.AboutDialog Test',
            logo=icon
        )

        dialog.present()


def main():
    app = Gtk4TestApp()
    app.run()


if __name__ == '__main__':
    main()
まとめ
- Gtk.PopoverMenuBarのmodelは、XMLで作成することが可能です。
- XMLでは、メニューの大本にidを付けて、その下の<submenu></submenu>内に’ファイル’などを定義し、その中の<item></item>内に’終了’などの項目を記入します。
- ‘ファイル’や’ヘルプ’など項目を入れるものにはlabelを指定し、’終了’などの項目にはlabelとactionを指定します。
- XMLの読み込にはGtk.Builder.new_from_stringを使用して、get_stringでmenuを取得した後、Gtk.PopoverMenuBarのmodelに指定します。
次回の予定
次回は、HeaderBarの使用方法について見ていきます。